Today I spent quite a bit of time trying to print the main piece of the trumpet holder... The tension on the filament was loose and the bed was being sensitive. Eventually, I did get a print (larger piece you see below) and it fits pretty nicely (snaps into place) with a few sanded/snipped adjustments. I designed the bottom attachment piece, and printed that as well. There are a few measurements that need to be adjusted and I will add a bottom on the base piece for version 2.
A graduate student's musings on art, metalsmithing, digital fabrication and design, life, and everything in between.
Tuesday, June 30, 2015
S100 - The Arduino Starter Kit - Project 08
The LED Hourglass project is essentially learning how to tell time with light. This is a very controlled way to work with outputs. The tutorial recommended programming the LEDs to turn on every ten minutes... but really, who has time to wait an hour for results? So, I programmed mine to come on every 6 seconds... Not a very "square" way to tell time, but it gets the job done. 36 IS the new 60.
Monday, June 29, 2015
e-NABLE Fellowship - Karuna's Trumpet Holder
Today was the first "official" day of my e-NABLE Fellowship through the University of Wisconsin-Milwaukee. I was offered the fellowship earlier in the summer by Frankie, who has been an active member of the e-NABLE community for a couple years now. e-NABLE received a Google grant earlier this year, and part of that grant is going to design innovation... That is where I come in! I will be discussing my work with a couple other students from different Universities in the country.
I'm diving head first into a project that was started by some other UWM students last semester, Karuna's trumpet holder. The black part is what I am working to modify. The part currently is a little sloppy when attached to the trumpet, so I will be adjusting the tolerances and changing the fit a bit. After measuring and building the trumpet valves in Rhino, I created the part and sent the first test piece to the printer before I left for the night, so we will see how it works tomorrow.
Sunday, June 28, 2015
S100 - The Arduino Starter Kit - Project 06
Light Theremin - For this project, I learned how to make sound with the tone() function and how to calibrate analog sensors.
I like the way this sensor works without complication... no push button, no potentiometer... just changes in light.
Saturday, June 27, 2015
S100 - The Arduino Starter Kit - Project 05
For this project I discovered mapping values, using the arduino built in libraries, and how to use a servo motor.
Friday, June 26, 2015
S100 - The Arduino Starter Kit - Project 04
For this project, I was introduced to the PWM (pulse with modulation) technique, duty cycles, and photoresistor sensors.
The green photoresistor never seemed to be working... so I tried a few different photoresistors for this particular gel... but, still got the same results. I really like the fading that is being created by the amount of light visible to the sensor... I wonder if this would be a good way to change color in the compact mirror project...
Thursday, June 25, 2015
S100 - The Arduino Starter Kit - Project 03
Love-O-Meter! In the video you will see the results I got from the project. The sensor doesn't change very quickly, like I had originally expected it to... I watched the serial monitor a lot during the testing phase... I also modified the temperature variables in the code quite a bit... The temperature range settings I got to work are less drastic than what was recommended.
Wednesday, June 24, 2015
S100 - The Arduino Starter Kit - Project 02
Project 02 : Spaceship Interface
In this project, I was introduced to the basics of digital input and output, writing code, programming, and specifying variables. The kit came with this super-glitzy-gold piece of paper to help me set the mood for the action scene of my sci-fi movie - "ENGAGE HYPER-SPEED" (per the instructions).
Tuesday, June 23, 2015
S100 - The Arduino Starter Kit - Project 01
YES, the Arduino Starter Kit is packaged with just as much thought as each of the tutorials inside. I am blown away by how thorough this kit is. In just one tutorial, I feel like I've learned more than I did all last year on my own! Don't get me wrong - I definitely learned a lot last year - but never in such depth. It goes to show - sometimes it's worth spending the money on a "professional." Thank you, Mr. Arduino Starter Kit.
STEP ONE:
My first interactive circuit, using a switch, a resistor and an LED:
Series Circuit:
Parallel Circuit:
... and, OF COURSE, a little bit of playing around got me a big green letter-C.
Monday, June 22, 2015
S100 - Prusa i3 - Custom Aluminium Frame - Part 2
Engraving more logo-love: I CNC machined it.
I ended up engraving one side with a larger logo pattern and the other with a smaller variation. Despite the minor alignment issues, I'm pretty happy with the results! The pattern isn't exactly what I had originally wanted (due to careless vinyl application during the etching step) but I'm really happy with the results. MAN - that would have taken a long time to do by hand! I love technology (today).
#TOTD (tools of the day)
... And a quick look at it partially assembled.
I <3 CNC machines <--- T-Shirts coming soon ;)
Friday, June 19, 2015
S100 - Prusa i3 - Custom Aluminium Frame - Part 1
This week I designed a pattern to go on the frame of my Prusa i3. I am doing two different surface treatments - etching and CNC engraving. Today, I cut the vinyl sticker on the vinyl cutter for the resist and etched the aluminium.
I had to piece some of the edges together due to scale in Sure-cuts-a-lot being different than Rhino.
Frankie helped me mix up a batch of root kill, salt and water to etch the aluminium. After agitating in the solution for about 5 minutes, we took out the frame and the results are below.
Rinsing off all of the reddish-brown build up from the solution.
Peeling the resist off of the frame was tedious but well worth it for the results.
I'm really pleased with the level of detail the etching gave me. The natural oxidation of the aluminum is also a nice variation. I'm not sure If I will keep it until the end - but I will definitely wait to see what it looks like with the CNC engraved details before I clean it up.
To be continued...
Thursday, June 11, 2015
S100 - RhinoGold - Gem Creator
I have been creating these gem forms in Rhino for a couple days now by hand... Starting with a profile curve, extruding a small girdle, creating a duplicate edge of the girdle and then extruding that curve to a point...
The forms are turning out relatively nice - I'm getting interesting facets but they aren't true gem forms as both sides are the same.
I was browsing through the RhinoGold tool panel and noticed the Gem Creator tool and decided to give it a try. All this tool requires is the outline curve to create the gem shape and from there you are just selecting options on a tool panel. It significantly reduces the time spent modeling. This tool is a definite win.
Below you can see the gray gems are the ones I've created by hand, and the black were created by the Gem Creator tool.
I appreciate the ability to easily achieve consistency in the Gem Creator - You can also save your gems to a library to use them with other functions like the array and channel commands. I can definitely envision myself using this tool a lot in the future in jewelry to create and utilize custom stones/forms.
Wednesday, June 10, 2015
S100 - RhinoGold - 3D Texture
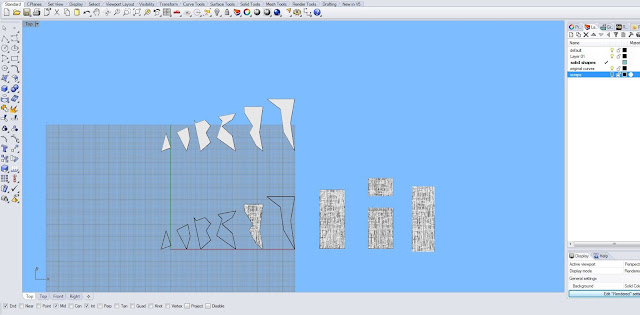
You cannot apply 3D texture to multiple surfaces at once...
You can create your own surface textures!
You cannot apply surface textures to irregular shapes... only rectangles.
You can cut rectangular surfaces into irregular shapes!
with cutting planes, using a boolean split operation.
Hooray!
But this makes for very large file sizes.
Above: Custom surface texture from two dimensional pattern.
You can add multiple 3D textures to one object!
Subscribe to:
Posts (Atom)